Gateway Dashboard tab
The Gateway Dashboard is the starting page in the Gateway web app. It displays a summary of what is currently occurring and everything that is needing the attention of users.
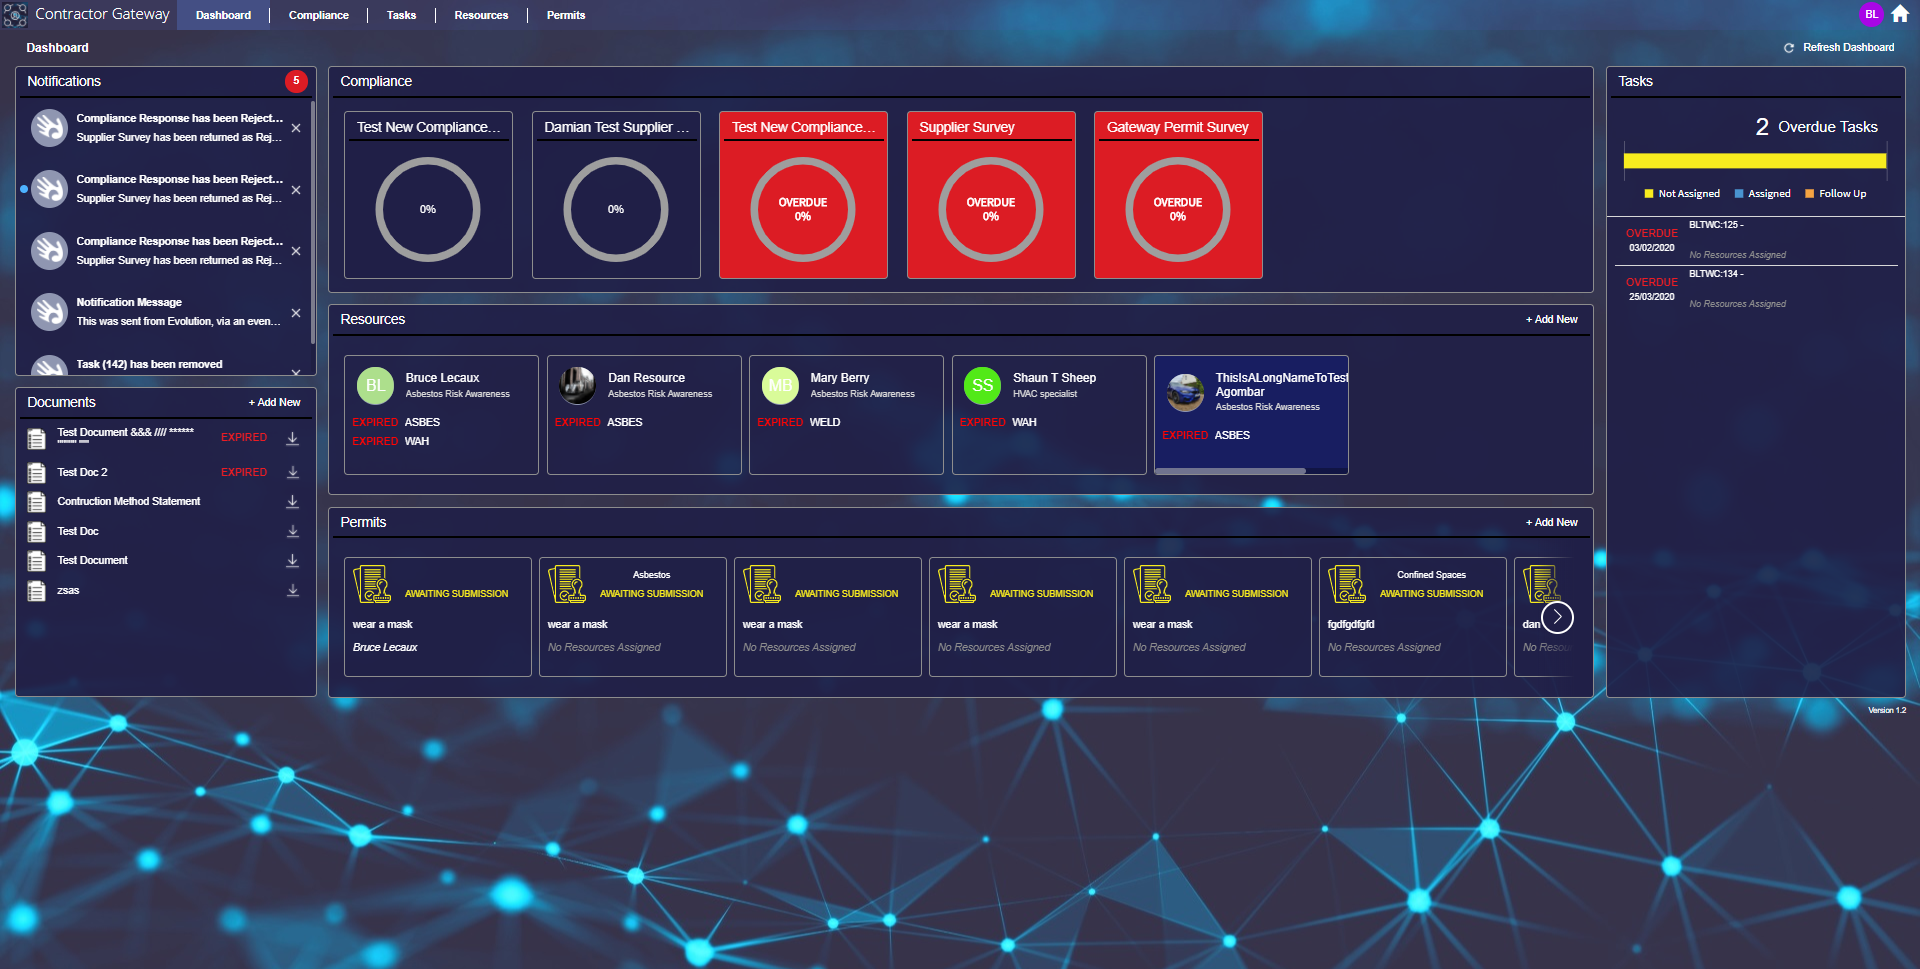
The Dashboard is made up of a set of standard 'widgets' to display the information. The widgets cannot be configured in any way.
Indicators, such as text and colouration are used in the widgets to make users aware of things needing their attention.
Clicking on an item in a widget will open the record in the relevant tab.
For example, clicking on an item in the Permits widget will open a work permit, the permit could be a mandatory requirement for a task that has been passed from MRI Evolution, the details must be filled in and submitted to MRI Evolution before work on a task can commence.
Notifications

The Notifications widget displays a scrollable list of events and occurrences related to the current supplier in Contractor.
The widget has a counter for the number of unread Notifications, as can be seen top-right in the screen grab above.
Unread Notifications are highlighted with a light blue dot to the left of the Notification in the list, as can be seen in the screen grab above. Clicking on an unread Notification will mark it as being 'read'. The counter of unread messages will be reduced by one when the widget is refreshed.
Sort order - latest created at the top.
Clicking on an item in the list will open a popup that displays summary information about the event.
For example:
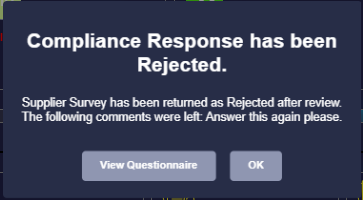
Some, but not all, Notification popups have a button to open the related entity, as per the 'View Questionnaire' button in the example above.
All popups have an 'OK' button. Clicking 'OK' will close the popup and return the user to the Dashboard.
The 'X' to the right of the Notification in the list will open a Delete Notification confirmation popup, as below:
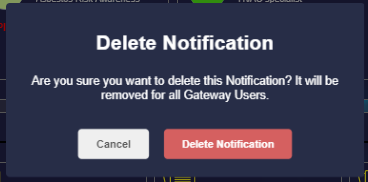
Clicking Cancel will close the popup and return the user to the Dashboard, the Notification will still be present in the widget.
Clicking Delete Notification will close the popup and return the user to the Dashboard, the Notification will no longer be present in the widget. Deleting an unread Notification will reduce the counter of unread Notifications accordingly.
Documents
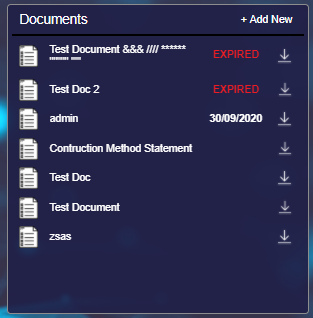
The Documents widget displays a scrollable list of Documents related to the current supplier in Contractor.
Documents assigned to the supplier in MRI Evolution will appear here as well as Documents added via the Documents widget.
Sort order - expiry date ascending, followed by Document Name ascending.
Documents that have an expiry date in the past will display the word 'EXPIRED' in red against it, as can be seen in the screen grab above.
Documents that have an expiry date in the future will display the actual expiry date in white, as can be seen in the screen grab above.
Documents without an expiry date set will show a blank space where the date would be, as can be seen in the screen grab above.
The actual file associated with a Document cannot be opened directly from the Documents widget but they can be downloaded by clicking the  button.
Adding Documents
Clicking the '+ Add New' button, top-right, will open the New Document popup:

Document Name is a mandatory field.
Adding an expiry date is optional. Click the checkbox to open a calendar picker and choose a date as appropriate.
Clicking 'Click to upload a document' will open a standard file browser to allow file selection.
A Document must be selected in order to save the record.
Clicking 'Save' will close the New Document popup (depending on validation of course) and return the user to the Dashboard, the Documents widget will be refreshed and a MRI Evolution integration workflow will upload the new Document to MRI Evolution and automatically assign it to the supplier.
Editing Documents
Note: The ability to edit documents has been removed in version 1.3 since updates cannot currently be reflected in MRI Evolution.
Compliance
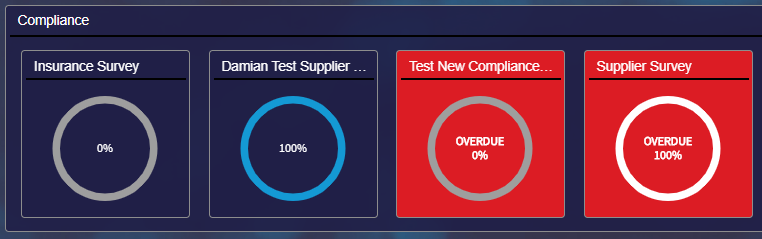
The Compliance widget displays a list of Questionnaires needing completion by the supplier. The Questionnaires will have been assigned to the supplier's record in MRI Evolution.
Sort order - Questionnaires are in target completion date order, left-to-right, closest first.
Colouring and text is used to indicate the current state of the Questionnaires. As can be seen in the screen grab above, from left-to-right:
- Coloured blue, 0% text and the ring has no colour - The target expiry date is in the future, the Questionnaire has not been answered
- Coloured blue, 100% text and the ring is coloured light blue - The target expiry date is in the future, the Questionnaire has been answered but not submitted to MRI Evolution
- Coloured red, OVERDUE 0% text and the ring has no colour - The target expiry date is in the past, the Questionnaire has not been answered
- Coloured red, OVERDUE 100% text and the ring is coloured white - The target expiry date is in the past, the Questionnaire has been answered but not submitted to MRI Evolution
Clicking a Questionnaire in the widget will open the Questionnaire itself, allowing the user to view and answer the questions as necessary.
Once a Questionnaire has been answered and submitted it will no longer be present in the Compliance widget.
Resources

The Resources widget displays a list of Resources having one or more saved Skill records with an expiry date in the near future (expiring) or in the past (expired).
The short name(s) of the expiring and/or expired Skills will be displayed, as can be seen in the screen grab above.
Sort order - Resource full name in alphabetical order.
Clicking a Resource in the widget will open the Resource record, not the expired Skill, allowing a user to take remedial actions upon the Resource's Skill record(s).
Once a Resource has no expiring or expired Skill records, they will no longer appear in the Resource widget.
New Resource records can be created by clicking the '+ Add New' button, top-right. The same new Response page will be opened as if the user clicked the 'Add New Resource' button in the Resources tab.
Permits

The Permits widget displays a list of Permit records with a state of 'AWAITING SUBMISSION'. In this case submission relates to submitting to MRI Evolution.
Sort order - by the valid to date, closest first.
Clicking a Permit in the widget will open the Permit record, allowing a user to view the Permit details and update as necessary.
Once a Permit has been submitted to MRI Evolution, it will no longer appear in the Permit widget.
New Permit records can be created by clicking the '+ Add New' button, top-right. The same new Permit page will be opened as if the user clicked the 'Add Permit' button in the Permits tab.
Tasks
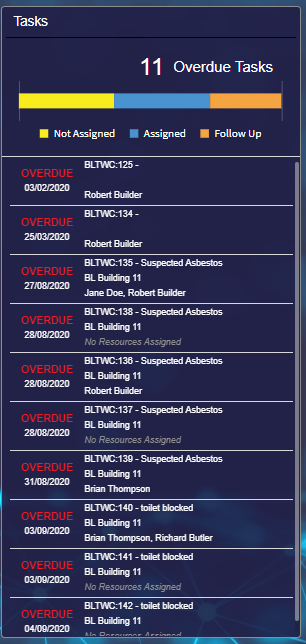
The Task widget displays a list of not yet complete overdue Tasks.
Sort order - closest due date first.
The screen grab below shows the colour indicator bar and the categories that make it up.
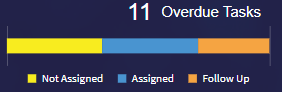
- Not Assigned - Task(s) that have yet been allocated to a Resource
- Assigned - Task(s) that have been allocated to a Resource
- Follow Up - Task(s) that have been marked in Contractor Kiosk as needing a follow up visit in order to complete the Task(s)
Clicking a Task in the widget will open the Task record, allowing a user to view the Task details and update as necessary.
Once a Task has been completed, without Follow Up, it will no longer appear in the Task widget.